Uses of Design Binders and Tags to improve design workflow
日期:2024-12-20 15:21:37 發布者: 智誠科技ICT 瀏覽次數:次
Very often, we have documents to rely on when we are designing our parts/assemblies. Various documents ranging from Word, PowerPoint or PDFs may be used. It is sometimes upset because it is difficult for us to recall/tidy up the documents used. We may have to send the files to colleagues/customers for multiple times.
很多時候,我們在設計零件/組件時都有可以參照的文件,像是 Word、PowerPoint 或 PDF 等各種文件。有時當我們整理所使用過的文件時會比較費時,我們可能需要分開幾次將文件發送給同事/客戶。
Today we will introduce a tool called Design Binder that you can bookmark those documents you have referred in SolidWorks files. It is a very easy folder-like tool to record the used documents.
今天我們將介紹一款名為 Design Binder 的工具,您可以使用它為您在 SolidWorks 檔案中引用的文件添加bookmark。它是一個非常簡單以及是類似folder的工具,我們可以用於記錄使用過的文件。
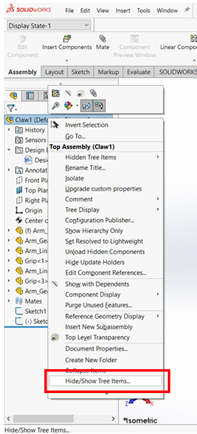
The Design Binder folder does not show up by default in SolidWorks when there are no bookmarked documents. To enable it as always, right-click any of the item in the FeatureManager Tree and then click “Hide/Show Tree Items…”.
預設情況下,Design Binder 資料夾不會顯示在 SolidWorks 中。要啟用它,我們可以右鍵單擊 FeatureManager 樹中的任意項目,然後按一下 “Hide/Show Tree Items…”。
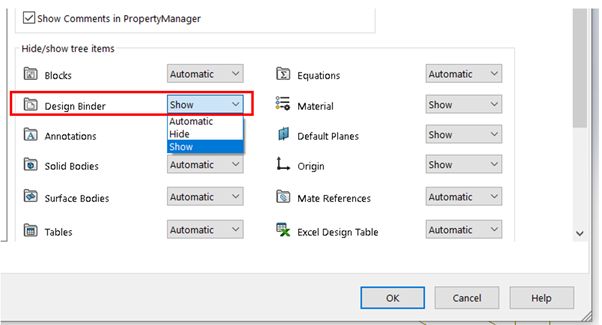
This will open System Options – FeatureManager window. Change the value of Design Binder from “Automatic” to “Show”. And then click “OK”.
這將開啟系統選項 – FeatureManager 視窗。將 Design Binder 的值從「自動」變更為「顯示」。然後按一下“OK”。
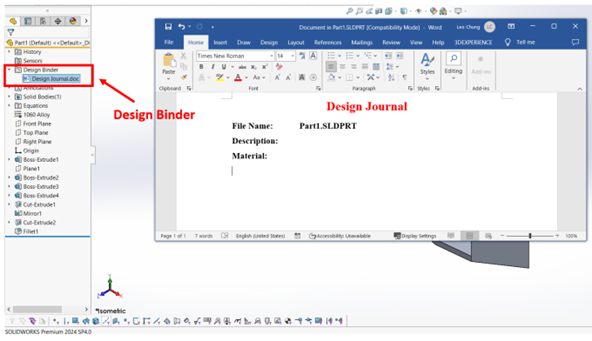
After that, we can see that the Design Binder folder will show up in the FeatureManager Tree. By default, there will be a word document called “Design Journal” created. You can use it to record your modelling log or add extra references as well.
之後我們可以看到 Design Binder 資料夾將顯示在 FeatureManager 樹中。預設情況下,會建立一個名為 ”Design Journal” 的Word文件。您可以使用它來記錄建模日誌或添加額外的參考文件。
Adding documents to Design Binder folder
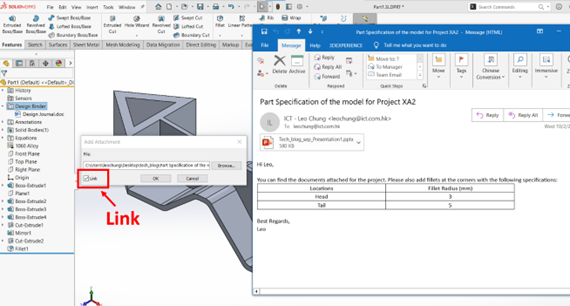
We can right-click the folder and select “Add Attachment” to include new files. Check “Link” so that the file will be linked to the original document. By checking it, we can include them when we do Pack and Go as well. This is very useful when we want to send the whole project files to colleagues with the reference documents attached. In this case, we include the email and the PowerPoint received to the Design Binder folder:
將文件新增至 Design Binder 資料夾
我們可以右鍵單擊該資料夾並選擇“Add Attachment”。選取“Link”,以便該文件將連結到原始文件,這樣我們便可以在打包時將它們包括在內。這對於我們想要將整個專案文件連同附加參考文件傳送給同事時非常有用。在這個示例中,我們會將收到的電子郵件和 PowerPoint 加到 Design Binder 資料夾中:
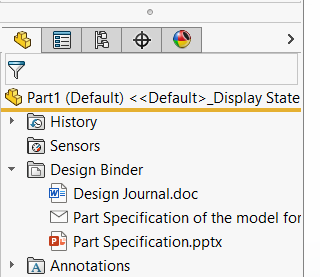
References added successfully, Part Specification of the model for Project XA2.msg and Part Specification.pptx:
成功加入參考文件:Part Specification of the model for Project XA2.msg 和Part Specification.pptx
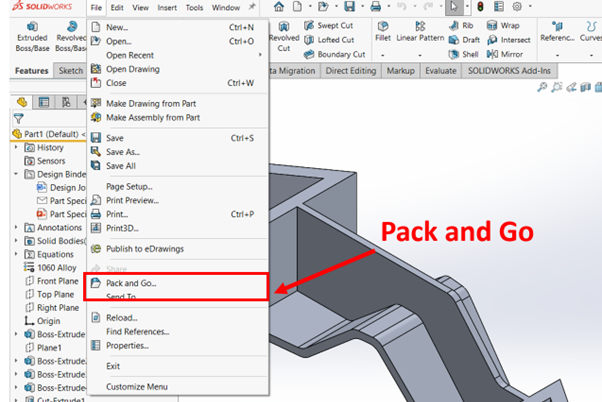
After finishing modeling, we can then go to File > Pack and Go... to include all the related files to folder.
完成建模後,我們可以來到File > Pack and Go...,將所有相關文件包到資料夾中。
In the Pack and Go window, we can see that the reference documents are shown there. We can include them in the folder and send to colleagues as well. Check “Save as zip file”. After that, we can share the zipped files to colleagues. You do not have to relocate or find the referred documents and send to colleagues separately.
我們可以看到參考文件顯示在 Pack and Go 視窗中。我們可以將它們包含在資料夾中並發送給同事。選取 “Save as zip file”。之後我們可以將檔案分享給同事。我們找到所引用的文件並單獨發送給同事。
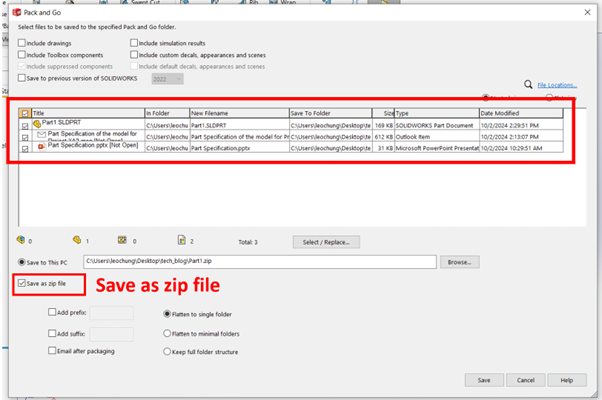
Note that the demonstration here shows a part file with references attached inside its Design Binder folder. It is applicable to assembly file as well.
注意此處演示用了SW Part文件,SW Assembly也可以用Design Binder功能。
When we are designing models, we want to group the features/components together in a folder but sometimes we cannot do so because of some limitations of folder. We can then make use of tag function in SolidWorks. Tags can somehow allow a better grouping and can be added to features or entire components to enable the searching/filtering of them afterwards. They can used in parts, assemblies and drawings.
當我們設計時,我們有時候會希望將feature/components收納到一個資料夾中,但有時資料夾會有些限制使我們無法這樣做。這時我們就可以利用SolidWorks中的tag功能了。我們可以用Tag來進行一定程度的分組,並且可以添加到parts/ assembly,以便以後能夠搜尋/過濾它們。它們可用於零件、組裝和圖紙。
Insert Tags to features/components:
Tags windows can be enabled in the status bar in the bottom right-hand corner of SolidWorks.
將Tags插入功能/組件:
我們可以在 SolidWorks 右下角的狀態列中啟用tag視窗。
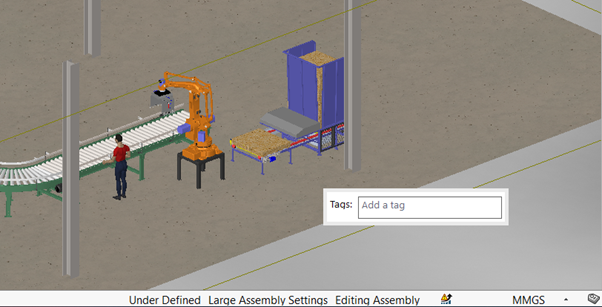
To add tags, we can select the items in the FeatureManager Tree or use box-select in the graphics area (particularly useful when labelling in assembly mode). After that, we can type the tag name to create a new tag. We can activate the tag window to select add tags from the existing as well.
若要新增tags,我們可以選擇FeatureManager樹中的項目或在圖形區域中選擇(在裝配體模式下時特別有用)。之後我們可以輸入名稱來建立新tag。如果已經創建了tags,我們可以啟動tag視窗以從現有tag中選擇新增tag。
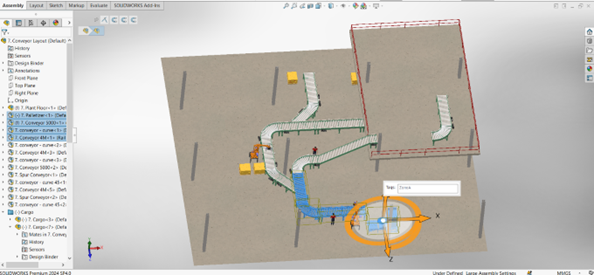
Note that each item can consist of multiple tags, and each tag are separated by a semicolon “;”.
注意每個feature/part/subassembly可以有多於一個tag,tag之間會以分號「;」分隔。
Search with Tags: How and When? 使用tag搜尋:如何? 什麼時候?
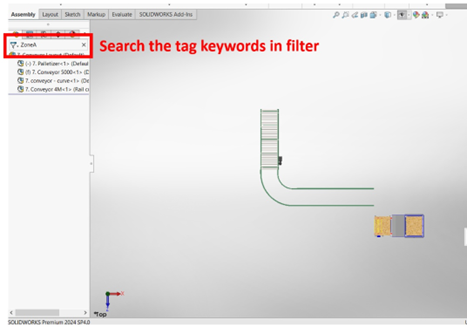
To locate tagged items, we can use search window in the FeatureManager Tree. After that, you will see that the results will be filtered and the graphic window will display/highlight the components with the keyword(s).
要尋找已被標記的項目,我們可以使用 FeatureManager 樹中的搜尋視窗,輸入關鍵字,之後我們將看到結果,圖形視窗將顯示/突出顯示帶有關鍵字的元件。
You can think of different ways to apply tags in your project. For a floor plan assembly, we can add tags to filter components in different zones. For parts, we can use tags to label features like special manufacturing methods.
您可以考慮在專案中套用標籤的不同方法。以平面圖裝配assembly為例,我們可以新增tag來過濾不同區域中的組件;對於零件part,我們可以使用tag來標記特殊製造方法等特徵。
Delete tags:
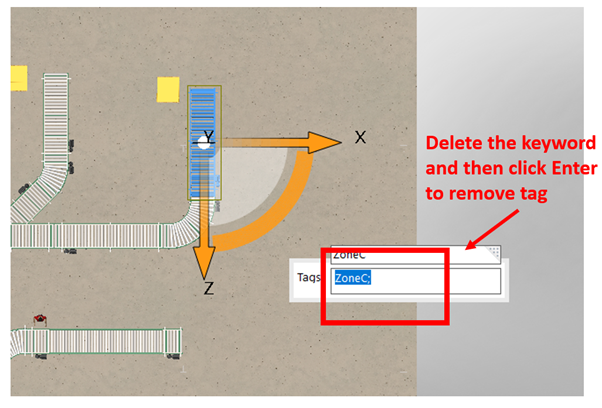
To delete added keyword(s), we can select the items/components, select the keyword(s) in the tag window and click Delete, and then press Enter
刪除標籤:
要刪除tags,我們可以選擇項目/元件,在視窗中選擇關鍵字並點擊Delete,然後按 Enter。
Note that when using tags, there are no items created in custom properties, tags are for searching/filtering in FeatureManager only.
注意使用tags時,自訂屬性(custom properties)中不會建立任何項目,tag只是用於在 FeatureManager 中搜尋/過濾。
The use of tags is similar to that of folder since we can apply them to classify items. Both of them can be used in part or assembly mode. In part mode, folder(s) can only group subsequent features while tags can be added to features in any orders.
Tag的使用與資料夾(folder)的使用類似,我們可以應用它們來對項目進行分類。它們都可以在零件或組裝模式下使用。在零件模式下,資料夾只能對接連的特徵進行分組;而tags則不受此限。
Apart from that, in drawing mode, there are no folder functions but we have tags to filter items.
除此之外,我們在drawing模式下沒有資料夾功能,但我們可以用tags來找尋項目。
Written by Leo


